When editing with adobe premiere, the following keywords are necessary to consider when editing a motion picture. I will provide explanations for each.
Before beginning to import files, I feel that it is important to organise and rename files accordingly in order to avoid confusion. For example, I like to create folders containing clips from each scene which are each numbered. Then it is possible to create a bin within the editing software in order to easily edit the footage without confusion.
Workspace:

- Timeline - this is where the edited footage appears when cut to shape in the preview window. Then, using the tools available, the footage can be tweaked and edited to a greater extent. This is also where the audio and effects can be accessed.
 - Effects - this is where the audio and video effects and transitions are found and can be searched for ready to be dragged into the timeline.
-Effect controls - this is where the specific effects can be set or changed - normally away from the default. For example, if a brightness effect was dragged to the timeline, the effect controls tab can be used to vary the level of brightness on the clip at a specific level.
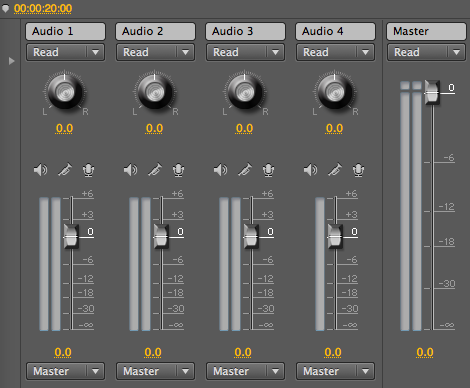
- Audio Mixer - in this tab, there are adjustable levels which correspond to the different audio tracks found on the timeline. When editing, peaks should arrive at around -6db in order to get audio which is not distorted. If audio peaks at 0db when unedited, the audio is then unusable and needs to be re-recorded.
For my particular project, I will be using the basic 'editing' layout since it is simple and easy to use. In addition, it is an excellent layout since all the vital functions and facilities in premiere are available.
Creating a new project:
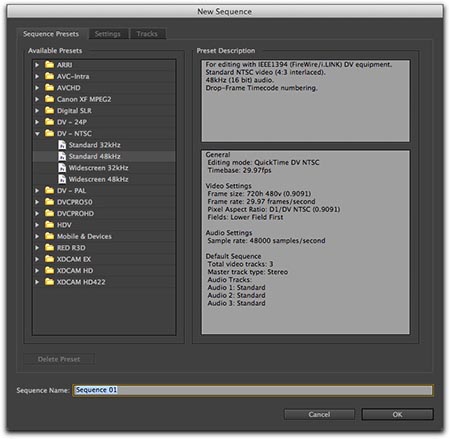 When creating a new project, the "New project" window appears. Despite all these settings being safely default, it is possible to change the video/audio display format (Video can be shown in minutes and seconds OR frames) Audio can be displayed in small audio samples or in milliseconds. I personally use both depending on the different types of project I am editing. We also get a choice of Capture format which can be set to DV or HDV. Again, I like to use both options. However, HDV tends to be a more lossy format meaning that in professional projects, DV is more useful. This window is where the project name can be defined.
On the next window, a series of presets are available. All of these are very important and very different in their own ways. In the past, I have experimented with almost all of these formats in order to find the best ones. However, the 'best ones' are defined by what the user is trying to achieve. For example, for editing standard definition footage, one of the presets under the "DV - Pal" would be a good choice since that is the default for TV in this country. For high definition, AVCHD, HDV or DVCPROHD can be used to gain professional results. Aside from these presets, users can set resolutions and frame rates to their specification. Personally, I tend to use the "settings" tab in order to construct my own presets ready to use to my specification.
Here, you can choose audio sample rate, resolution, editing mode, frame rate, bit depth and aspect ratio.
Importing:
Importing footage into the timeline is very simple - so long as all of the footage is shot with the same camera (which is why I chose to shoot this project with the same AVCHD camera) This is because all of the footage is the same resolution, bit-rate and frame-rate. This means that the project will look continuous in the final export. Simply drag audio/video items into the bin in order to start editing them. Premiere will then conform the audio files and store these temporary files into "C/Users/Username/Appdata/Roaming/Adobe/Common files. When editing is finished, it is always necessary to have access to these files ready for deletion. Otherwise, computers using Premiere will be very slow and frustrating to use - due to the huge amount of storage these files displace.
When importing footage shot on different cameras, it is necessary to enter the "Interpret footage" dialogue in order to conform the aspect ratio, resolution and frame rates to fit the best quality footage. Despite this creating a quality gradient between different pieces of footage. However, the footage will be the same size and frame-rate - meaning that the final export will look, at the very least, acceptable.
Editing Clips:
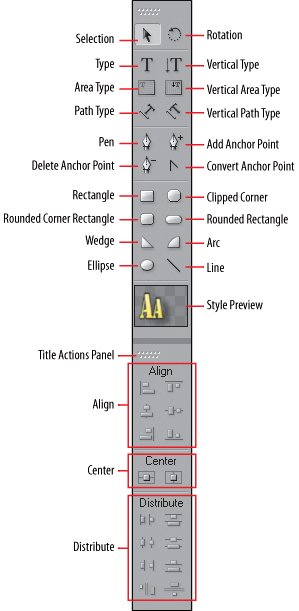 As you can see by the image, premiere features a toolbar containing the different ways to trim and edit pieces of footage. Most importantly, the razor tool and rate stretch tool are my preferred tools to use when editing. While both are fairly self explanatory by their names, other tools include the track select, ripple edit, rolling edit, slip tool, slide tool and pen tool. Interestingly, the ripple and rolling editing tools are more useful when editing larger projects. For example, if two pieces of continuous footage are placed together, ripple edit tool can be used to shorten one whilst lengthening the other while maintaining the same total duration of both clips. This is excellent since it does not interrupt subsequent footage and makes editing far quicker. Another interesting tool is the ability to delete empty space. This means that gaps between footage can be removed easily.
The Razor Function: In my opinion, the razor function is the most useful tool available. This lets you create a cut at any point along the timeline and effectively can split one clip into two shorter clips. Then, these smaller sections can be moved, clipped, changed to a different track or have effects added to them.
The rate stretch tool: Ideal for fast and slow motion, the rate stretch tool is ideal for shortening and lengthening clips by virtue of their speeds. For example, if a clip needed to be lengthened to fit a larger space on the timeline, the frame rate can be reduced, making the clip last longer but being in slow motion.
The roll edit function: On larger projects, the roll edit function can move the edit point between two clips. Effectively, this shortens one clip and lengthens the other without changing their mean overall length: the rest of the timeline is not effected by this editing technique.
Editing to match audio:
Sometimes, it is necessary to fit footage to audio. This technique is best explained through example. In a scenario where an ambient soundtrack suddenly plays an explosion, and your filmed footage has a similar visual explosion. By marking the specific moment of the explosion in both the audio and video tracks, it is possible to match both tracks to that moment in order to unite the audio and visuals to give the illusion of them working together.
Hopefully, in our project, we will be using this technique to match our event audio to different footage in the interest of audio continuity. When filming, we purposely captured 2-3 minutes of audio at the start at each shoot so that this audio could be used throughout the clip. The advantage of this is that no audio cuts can be detected by the audience and, if necessary, additional audio can still be added into separate tracks if needed. Therefore, in this project, this technique will be used greatly.
Hopefully, in our project, we will be using this technique to match our event audio to different footage in the interest of audio continuity. When filming, we purposely captured 2-3 minutes of audio at the start at each shoot so that this audio could be used throughout the clip. The advantage of this is that no audio cuts can be detected by the audience and, if necessary, additional audio can still be added into separate tracks if needed. Therefore, in this project, this technique will be used greatly.
Continuity:
 In order for edited footage to look professional, continuity must be considered. Continuity is key to make any piece of footage look professional and friendly and easy to watch. An example of a continuity error can occur when cutting between any two pieces of footage. For example, if the subject was holding its hand in the air in the first shot and, in the second shot, the same hand was immediately back down on his lap, this is considered a continuity error; the transition was not a smooth one. To avoid such errors, the editor should wait until the subject moves their hand back onto their lap before they make the cut.
However, continuity errors can happen in more subtle ways: if the subject is holding a glass in their left hand for the first shot and, for the second, if the subject is then holding the same glass in their right hand - without a logical transition, this is also considered a continuity error.
The key difference between these two errors is that the first can be corrected during editing. However, the second cannot be rectified during the edit if the production process has already concluded.
In our video, continuity will need to be checked multiple times in order to ensure that the footage is continuous and flowing. I will have to ensure that I review all of my edits to ensure that errors in audio and video continuity are avoided if possible and evaluated if not.
Colour Correction:

Split into three sections, colour correction can change the shadows, highlights and outlines. Using similar colour choices in these three catagories is normally the most effective: a technique that I plan to use extensively throughout my post production. I think that this is incredibly effective since setting the correct colours can set the mood very effectivly for the footage.
Titles:
In digital video, there are two main types of titles: static titles and rolling titles. As the name suggests, static titles remain on the same position on the screen without changing position. In a documentary style video like ours, static titles are useful for subtitles or to display the names of those interviewed. They are effective since they do not change position and therefore, are easy to read. Unfortunately, static titles are less useful for large amounts of text due to the fact that it would either dominate too much space on the screen or alternatively, be too small to read. In our project, static titles will be useful in the ways described above since we have one or two interviews that we wish to include.
As for rolling titles, they do not remain in the same position for their duration on screen. Instead, they can scroll vertically or horizontally. For example, for news broadcasts, rolling titles often scroll horizontally across the bottom of the screen. Similarly, for film credits, it is the convention that rolling titles can be seen scrolling from bottom to top in order to display the large amount of names. Contrary to to static titles, rolling titles are ideal for large amounts of text since only a small amount of text is displayed at any one time. However, the downside is that if the text scrolls too fast, it can be distracting or, even worse, be illegible. Although, at a moderate speed, rolling titles will be very effective. In our project, we plan to include a small credits roll at the end in order to optimise the use of both static and rolling titles.
File Storage

Since these measures are in the interest of saving time during post production, I personally feel that some of these practices waste more time than they save. Since all of our scenes consist of no more than ten clips each, it is perfectly sufficient to simply arrange files into respective folders and look at their thumbnails as opposed to file names. This will save time and be much more convenient when editing since you are able to see what you want instead of having to read a file name and associate it with what was filmed in the shot. However, I do realise that in larger projects, naming files as well as organising them is absolutely necessary.
Narrative Flow:
In film making, especially story telling, narrative flow is extremely important when maintaining a clear concise story. However, there are many many aspects that can have an impact on the narrative flow of a project. For example, a continuity error like the ones mentioned above could confuse the audience. Or, simply just noticing continuity errors could bring the audience out of the story and make the story less believable. Similarly, lack of explanation for key themes in a story could have a serious impact on narrative flow; the audience may not understand what is going on.
However, at a higher level, narrative flow can be achieved by leaving subtle hints to the audience about what is going on. Firstly, using pathetic falicy in scenes can give the audience an idea as to what is going on. For example, if there was rain outside in a particular scene, this will imply that there is negativity occurring on-screen.
Secondly, narrative flow can be achieved through means of cinematography. More specificity, broadcasting lots of reds on screen could symbolise danger or tension whereas broadcasting blues and greens could alternatively symbolise peacefulness and safety. Using these techniques is more useful in dramatic film sequences as opposed to documentaries such as the project we are doing- however, it is useful to consider using these techniques if the possibility arises.

Transitions:

When editing in adobe premier, it can sometimes be beneficial to use transitions in order to make cuts seem smoother or more interesting. Such transitions can be found within the effects tap of the adobe tool bar. Transitions include, cross fade, random bars, barn doors and many other interesting transitions. However, in the present day, it is considered unprofessional to use many of these transitions without a valid reason. As a result of this, a cross fade or straight cut is all that is necessary for cutting scenes.
Alternatively, to emphasise the beginning or end of a scene, it can sometimes be effective to fade in our out from black or white in order to show that the section of film has ended. This can be useful to avoid abrupt endings or to gently ease the audience away from a particular theme into another.
Similarly, audio transitions do occur but are far more limited; normally fades and cross fades are often the only ones used and mainly operate simultaneously beside a video track.
Most transitions can be dragged into the timeline from the effects tab where they can be more precisely configured for professional use. In the same way, transitions can be removed by simply selecting the implement and hitting delete on the keyboard.
Effects:
When editing with adobe premier, adding effects can sometimes contribute to the effectiveness of a piece of footage. Weather this is done with colour correction, cropping or special effects, it is clear that there are a wide range of different effects to use on your project. Effects can be found under the "effects" tab and are categorised.
Taking a closer look, effects under the stylise category aim to stylishly manipulate footage in some way or another. For example, lens flares, mosaic effects, or distortion.
For another category, the "keying" category can be used to mask in our out certain sections of the image. For example, colour key can be used to mask out areas of a certain colour whilst "luma" key effects can be used to mask certain colour shades and temperatures.
 Effects can come in many different forms and in many different ways. However, similar to transitions, some should be avoided. Although, it is always fairly easy to tell weather an effect looks professional or not: if it positively influences the scene to increase effectiveness or audience engagement, then it should be retained. However, if it adds unnecessary confusion or annoyance, then it should be removed in order to gain a high quality piece of digital media.
Most effects can be dragged into the timeline from the effects tab where they can be more precisely configured for professional use: values can be changed manually or certain presets are sometimes readily available for download or instant use. In the same way, effects can be removed by simply selecting the implement and hitting delete on the keyboard.
In our project, our effects will mainly consist of colour correction. However, I may use certain slow motion effects such as "strobe light" in order to enhance the comic aspect of our short film. However, effects can play a larger part in different projects - sometimes totally different to this!
Still image sequences:
Sometimes, when editing, it can be interesting to convert your footage into a still image sequence. This can be done by choosing the "export frame" option in premiere or after effects. Alternately, you can obtain such still images from other sources such as a webcam or online. Then, by deleting certain frames, you can make your sequence look more choppy, unnatural or stylised. Similar effects can also be achieved by altering the frame rates when the files are re-imported back into the editing medium.
Another way you could use still image sequences could be to shoot each frame as a separate image and animate actors or inanimate objects in a way that makes them appear lifelike.
In another circumstance, still image sequences could be as little as a slideshow of photographs put to music. All of these options depend on the type of project you are conducting and some may not be relevant to particular projects.
Especially for our project, which is based on live action, still image sequences may look out of place in our documentary style video and as a result, we will not be using them for these purposes. However, it is worth bearing them in mind for future projects where their relevance may increase.
Exporting:
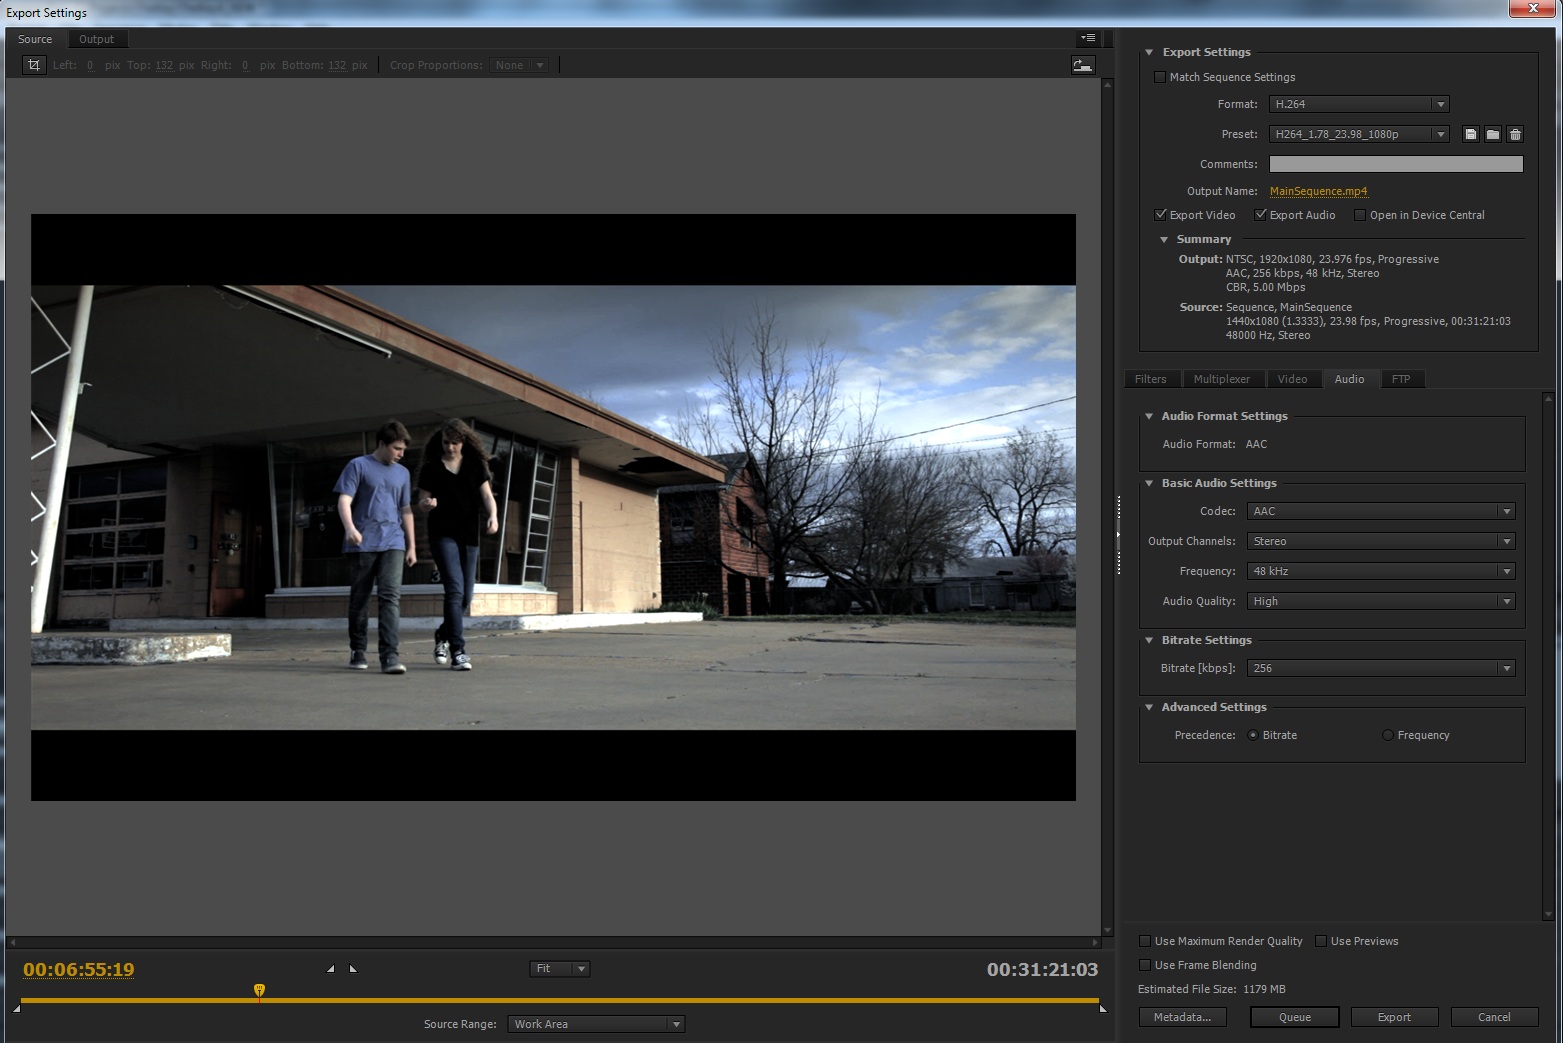 Exporting options within premiere are immense: ranging from high definition to standard definition inside a multitude of different formats. As mentioned in previous posts, different file formats can have different uses. However, for this project, we plan to be using high quality settings which will make for a high quality media project. More specificity, I normally use MPEG-II formats with a 1080p (non interlaced) resolution. While retaining quality, this file format is ideal for online use due to its slightly reduced file size which is the product of slight compression.
In our project, our effects will mainly consist of colour correction. However, I may use certain slow motion effects such as "strobe light" in order to enhance the comic aspect of our short film. However, effects can play a larger part in different projects - sometimes totally different to this!
Still image sequences:
Sometimes, when editing, it can be interesting to convert your footage into a still image sequence. This can be done by choosing the "export frame" option in premiere or after effects. Alternately, you can obtain such still images from other sources such as a webcam or online. Then, by deleting certain frames, you can make your sequence look more choppy, unnatural or stylised. Similar effects can also be achieved by altering the frame rates when the files are re-imported back into the editing medium.
Another way you could use still image sequences could be to shoot each frame as a separate image and animate actors or inanimate objects in a way that makes them appear lifelike.
In another circumstance, still image sequences could be as little as a slideshow of photographs put to music. All of these options depend on the type of project you are conducting and some may not be relevant to particular projects.
Especially for our project, which is based on live action, still image sequences may look out of place in our documentary style video and as a result, we will not be using them for these purposes. However, it is worth bearing them in mind for future projects where their relevance may increase.
Exporting:
Exporting options within premiere are immense: ranging from high definition to standard definition inside a multitude of different formats. As mentioned in previous posts, different file formats can have different uses. However, for this project, we plan to be using high quality settings which will make for a high quality media project. More specificity, I normally use MPEG-II formats with a 1080p (non interlaced) resolution. While retaining quality, this file format is ideal for online use due to its slightly reduced file size which is the product of slight compression.
No comments:
Post a Comment